This is the legacy documentation of Project-level Custom Applications, which is in maintenance mode. Visit the new documentation for Org-level Custom Applications.
Example Deployment with AWS, S3 and CloudFront
This deployment example refers to AWS static hosting using an S3 bucket, CloudFront distribution, and a Lambda@Edge function generated with CloudFormation.
Prerequisites
Before you get started, you need to have:
A commercetools account and a project.
In this example we are going to use the commercetools platform running on the North America cloud region on Google Cloud.
An AWS account.
This documentation uses the CloudFormation console. The AWS CLI can be used for further automation.
Create AWS Resources
CloudFormation is utilized to generate and configure the necessary AWS resources for hosting your Merchant Center Custom Application. The CloudFormation template will generate an S3 bucket configured with static website hosting and a CloudFront distribution backed by a Lambda@Edge function configured to deliver the S3 content securely.
- Copy and save the below CloudFormation template as a
.jsonfile:
{"AWSTemplateFormatVersion": "2010-09-09","Dscription": "Creates a static website using S3 and CloudFront for deploying Merchant Center Custom Applications","Parameters": {"BucketName": {"Type": "String","Description": "The name for the bucket hosting your website"},"LambdaCode": {"Type": "String","Dscription": "The Lambda code generated by AWS transformer during mc-scripts compile-html"},"LambdaVersion": {"Type": "String","Dscription": "Version alias for lambda code (can be a random string)"}},"Conditions": {"HasLambdaCode": {"Fn::Not": [{ "Fn::Equals": ["", { "Ref": "LambdaCode" }] }]}},"Metadata": {"AWS::CloudFormation::Interface": {"ParameterGroups": [{"Label": {"default": "Website Configuration"},"Parameters": ["BucketName"]},{"Label": {"default": "Lambda Configuration"},"Parameters": ["LambdaCode", "LambdaVersion"]}],"ParameterLabels": {"BucketName": {"default": "S3 Bucket Name"},"LambdaCode": {"default": "Generated Lambda Contents"},"LambdaVersion": {"default": "Lambda Version Alias"}}}},"Resources": {"WebsiteBucket": {"Properties": {"BucketName": {"Ref": "BucketName"},"WebsiteConfiguration": {"IndexDocument": "index.html"},"CorsConfiguration": {"CorsRules": [{"AllowedHeaders": ["*"],"AllowedMethods": ["GET"],"AllowedOrigins": ["*"],"Id": "OpenCors","MaxAge": "3600"}]}},"Type": "AWS::S3::Bucket"},"WebsiteBucketPolicy": {"Properties": {"Bucket": {"Ref": "WebsiteBucket"},"PolicyDocument": {"Version": "2012-10-17","Statement": [{"Effect": "Allow","Principal": "*","Action": "s3:GetObject","Resource": {"Fn::Sub": "arn:aws:s3:::${WebsiteBucket}/*"}}]}},"Type": "AWS::S3::BucketPolicy"},"WebsiteCloudFront": {"Type": "AWS::CloudFront::Distribution","DependsOn": ["WebsiteBucket"],"Properties": {"DistributionConfig": {"Origins": [{"DomainName": {"Fn::GetAtt": ["WebsiteBucket", "RegionalDomainName"]},"Id": {"Ref": "WebsiteBucket"},"CustomOriginConfig": {"HTTPPort": "80","HTTPSPort": "443","OriginProtocolPolicy": "http-only"}}],"Enabled": "true","DefaultRootObject": "index.html","DefaultCacheBehavior": {"TargetOriginId": {"Ref": "WebsiteBucket"},"ViewerProtocolPolicy": "redirect-to-https","AllowedMethods": ["GET", "HEAD", "OPTIONS"],"CachedMethods": ["GET", "HEAD", "OPTIONS"],"Compress": false,"ForwardedValues": {"QueryString": "true","Cookies": {"Forward": "none"},"Headers": ["Access-Control-Request-Headers","Access-Control-Request-Method","Origin"]},"LambdaFunctionAssociations": [{"EventType": "origin-response","LambdaFunctionARN": {"Fn::GetAtt": ["LambdaEdgeFunctionVersion", "FunctionArn"]}}]},"PriceClass": "PriceClass_100","ViewerCertificate": {"CloudFrontDefaultCertificate": "true"},"CustomErrorResponses": [{"ErrorCode": 404,"ResponseCode": 200,"ResponsePagePath": "/index.html"},{"ErrorCode": 403,"ResponseCode": 200,"ResponsePagePath": "/index.html"}]}}},"LambdaEdgeFunction": {"Type": "AWS::Lambda::Function","Properties": {"Handler": "index.handler","Role": {"Fn::GetAtt": ["LambdaEdgeFunctionRole", "Arn"]},"Code": {"ZipFile": {"Fn::If": ["HasLambdaCode",{ "Ref": "LambdaCode" },"exports.handler = (event, context, callback) => {};"]}},"Runtime": "nodejs8.10"}},"LambdaEdgeFunctionRole": {"Type": "AWS::IAM::Role","Properties": {"Path": "/","ManagedPolicyArns": ["arn:aws:iam::aws:policy/service-role/AWSLambdaBasicExecutionRole"],"AssumeRolePolicyDocument": {"Version": "2012-10-17","Statement": [{"Sid": "AllowLambdaServiceToAssumeRole","Effect": "Allow","Action": ["sts:AssumeRole"],"Principal": {"Service": ["lambda.amazonaws.com", "edgelambda.amazonaws.com"]}}]}}},"LambdaEdgeFunctionVersion": {"Type": "Custom::LatestLambdaVersion","Properties": {"ServiceToken": {"Fn::GetAtt": ["PublishLambdaVersion", "Arn"]},"FunctionName": {"Ref": "LambdaEdgeFunction"},"Nonce": {"Ref": "LambdaVersion"}}},"PublishLambdaVersion": {"Type": "AWS::Lambda::Function","Properties": {"Handler": "index.handler","Runtime": "nodejs8.10","Role": {"Fn::GetAtt": ["PublishLambdaVersionRole", "Arn"]},"Code": {"ZpFile": "const {Lambda} = require('aws-sdk')\nconst {send, SUCCESS, FAILED} = require('cfn-response')\nconst lambda = new Lambda()\nexports.handler = (event, context) => {\n const {RequestType, ResourceProperties: {FunctionName}} = event\n if (RequestType == 'Delete') return send(event, context, SUCCESS)\n lambda.publishVersion({FunctionName}, (err, {FunctionArn}) => {\n err\n ? send(event, context, FAILED, err)\n : send(event, context, SUCCESS, {FunctionArn})\n })\n}\n"}}},"PublishLambdaVersionRole": {"Type": "AWS::IAM::Role","Properties": {"AssumeRolePolicyDocument": {"Version": "2012-10-17","Statement": [{"Effect": "Allow","Principal": {"Service": "lambda.amazonaws.com"},"Action": "sts:AssumeRole"}]},"ManagedPolicyArns": ["arn:aws:iam::aws:policy/service-role/AWSLambdaBasicExecutionRole"],"Policies": [{"PolicyName": "PublishVersion","PolicyDocument": {"Version": "2012-10-17","Statement": [{"Effect": "Allow","Action": "lambda:PublishVersion","Resource": "*"}]}}]}}},"Outputs": {"S3WebsiteURL": {"Value": {"Fn::GetAtt": ["WebsiteBucket", "WebsiteURL"]}},"CloudFrontDomain": {"Value": {"Fn::GetAtt": ["WebsiteCloudFront", "DomainName"]}}}}
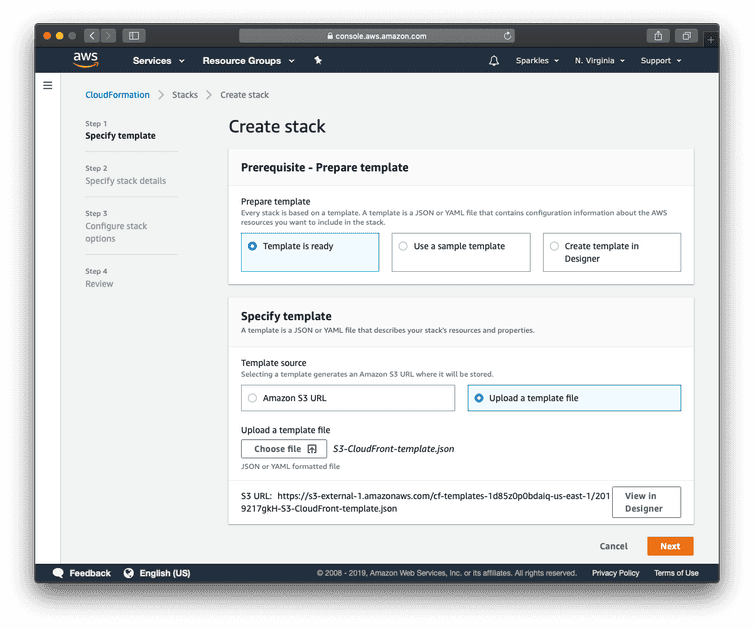
- In the CloudFormation console verify that you are in the US East (N. Virginia) region and click Create Stack.
The US East (N. Virginia) region is required to use Lambda@Edge functions, which are used by the CloudFront distribution.
- Select the Template is ready and Upload a template file options, upload the template file created in the first step, and click Next.
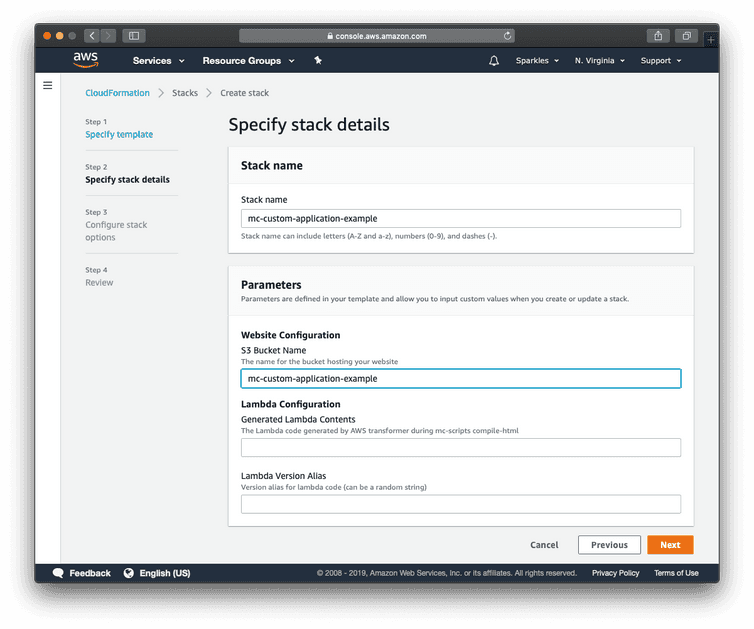
- Enter a unique stack name and a name for a new S3 bucket following these requirements.
The Lambda Configuration section will be filled out in a later section.
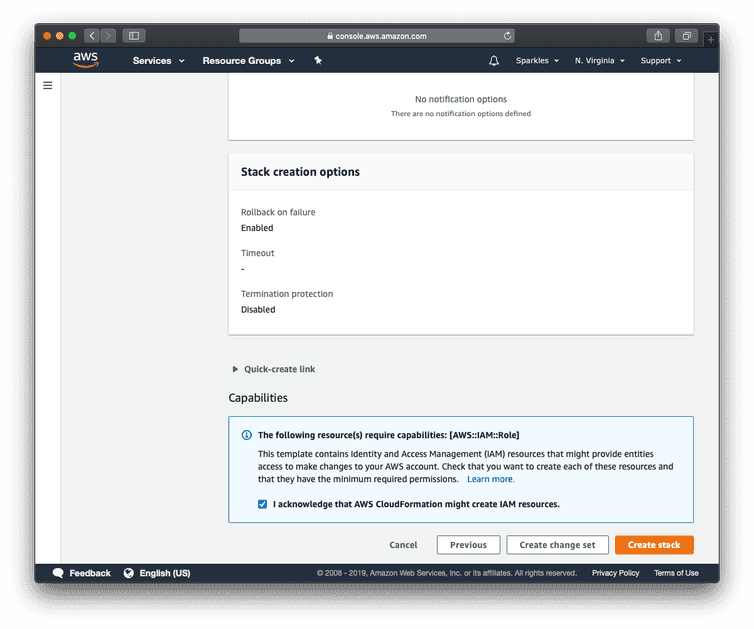
Continue through the wizard with the default selections until the Create stack button is shown.
Click the checkbox acknowledging the creation of IAM roles and then click Create stack. The stack will take approximately 15 minutes to complete.
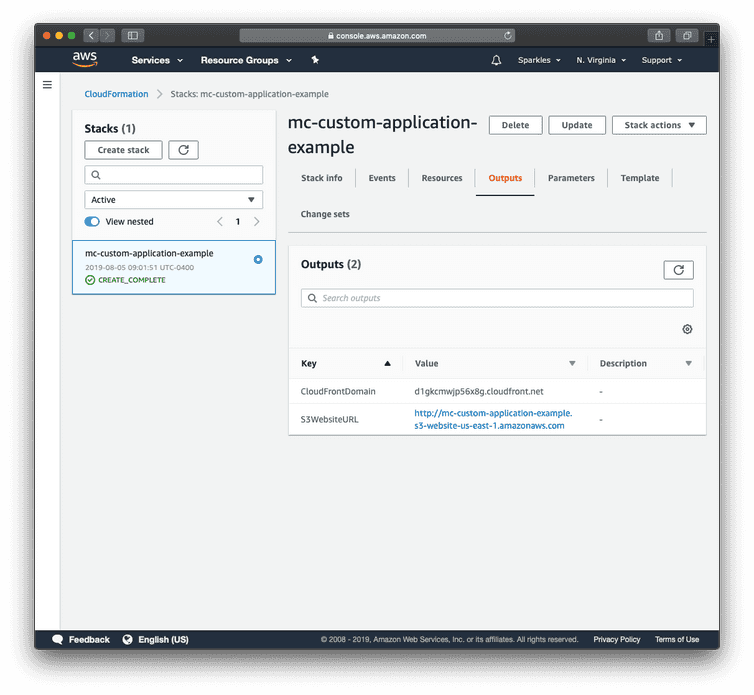
- After the status in CloudFormation changes to CREATE_COMPLETE, select your stack, and choose the Outputs tab. Make a note of the CloudFront domain name (for example CloudFrontDomain).
Configuration
To start, we need to update the custom-application-config.json file with the production URL (replace the [cloudfront-domain] with the real CloudFront domain, obtained from the last step of the previous section):
{"name": "My app","entryPointUriPath": "my-route","cloudIdentifier": "gcp-eu","env": {"production": {"url": "https://[cloudfront-domain]"}}}
If we were to deploy the application at this point, it won't work as the Custom Application does not have an index.html after building the production bundles.
To make it work, we need to compile the application first.
Compile the application
To be able to deploy the Custom Application to AWS CloudFront, the Custom Application needs to be compiled.
mc-scripts compile-html
The command above does what we need: it compiles the index.html using the JavaScript bundle references (after running mc-scripts build) and the runtime configuration. At this point the index.html file is ready for production usage.
However, the Custom Application needs to instruct the User-Agent (the browser) to enforce certain security measures, using HTTP headers (done automatically by the application config).
Because of that, the Lambda function file cannot be defined statically. Instead, it needs to be generated programmatically when the Custom Application is built and compiled. To achieve that, we need to implement a transformer function.
Generate Lambda function using a transformer function
The compile-html command accepts an option transformer which we can use to pass the filesystem path to our transformer function.
We assume that the transformer function is defined at the following location: ./config/transformer-aws.js.
mc-scripts compile-html \--transformer ./config/transformer-aws.js
The purpose of the transformer function is to generate the final Lambda file given the compiled values passed to the function.
// Function signature using TypeScripttype TransformerFunctionOptions = {// The runtime environment specified within the application config.env: Json;// The compiled HTTP headers, including the Content-Security-Policy headers.headers: Json;// The final HTML content of the `index.html`.indexHtmlContent: string;}type TransformerFunction = (options: TransformerFunctionOptions) => void;
The main export of the file should be the transformer function.
module.exports = function transformer(options) {// ...}
With that in mind, we can implement the transformer function and write the Lambda config into the filesystem.
const fs = require('fs');const path = require('path');const rootPath = path.join(__dirname, '..');const generateLambda = setHeaders =>`exports.handler = (event, context, callback) => {const { request, response } = event.Records[0].cf;const { uri } = request;const { headers } = response;${setHeaders.join('\n\t')};callback(null, response);};`;module.exports = ({ headers }) => {const setHeaders = Object.entries({...headers,'Cache-Control': 'no-cache',}).map(([key, value]) =>`headers["${key.toLowerCase()}"] = [{key: "${key}", value: "${value}"}];`);fs.writeFileSync(path.join(rootPath, 'lambda.js'),generateLambda(setHeaders),{ encoding: 'utf8' });};
Adding fallback routes
This step is optional and does not prevent the application to be used within the Merchant Center. However, it's recommended to do so to avoid unexpected behaviors in case the URL, where the Custom Application is hosted, is accessed directly.
Accessing the Custom Application directly at https://[cloudfront-domain] won't work, as the application requires the user to log in and thus tries to redirect to the /login route at the same domain.
To prevent that, we can handle the login|logout routes and render a message. This is only meant to inform the user that the Custom Application cannot be used standalone.
const fs = require('fs');const path = require('path');const rootPath = path.join(__dirname, '..');const generateLambda = setHeaders =>`exports.handler = (event, context, callback) => {const { request, response } = event.Records[0].cf;const { uri } = request;const { headers } = response;${setHeaders.join('\n\t')};const shouldRewriteResponse = uri.includes('login') || uri.includes('logout');if (shouldRewriteResponse) {const rewriteResponse = {status: '200',statusDescription: 'OK',headers: {...headers,'content-type': [{ key: 'Content-Type', value: 'text/plain' }],'content-encoding': [{key: 'Content-Encoding',value: 'UTF-8'}]},body: \` This is not a real route. If you are seeing this, you most likely are accessing the Custom Application\\ndirectly from the hosted domain. Instead, you need to access the Custom Application from within the Merchant Center\\ndomain, as Custom Applications are served behind a proxy router.\\nTo do so, you need to first register the Custom Application in Merchant Center > Settings > Custom Applications.\`};callback(null, rewriteResponse);return;}callback(null, response);};`;module.exports = ({ headers }) => {const setHeaders = Object.entries({...headers,'Cache-Control': 'no-cache',}).map(([key, value]) =>`headers["${key.toLowerCase()}"] = [{key: "${key}", value: "${value}"}];`);fs.writeFileSync(path.join(rootPath, 'lambda.js'),generateLambda(setHeaders),{ encoding: 'utf8' });};
Update AWS Resources
To generate the Lambda function, run the compile-html command:
yarn buildmc-scripts compile-html \--transformer ./config/transformer-aws.js
The previously generated Lambda function has the important role of including security headers on all requests made to the CloudFront distribution. Here you will populate the contents of the Lambda function.
Copy the contents of the
lambda.jsfile generated by compiling your Custom Application.In the CloudFormation console, select your stack, and choose the Change sets tab.
Click Create change set and Next with the default Use current template option selected.
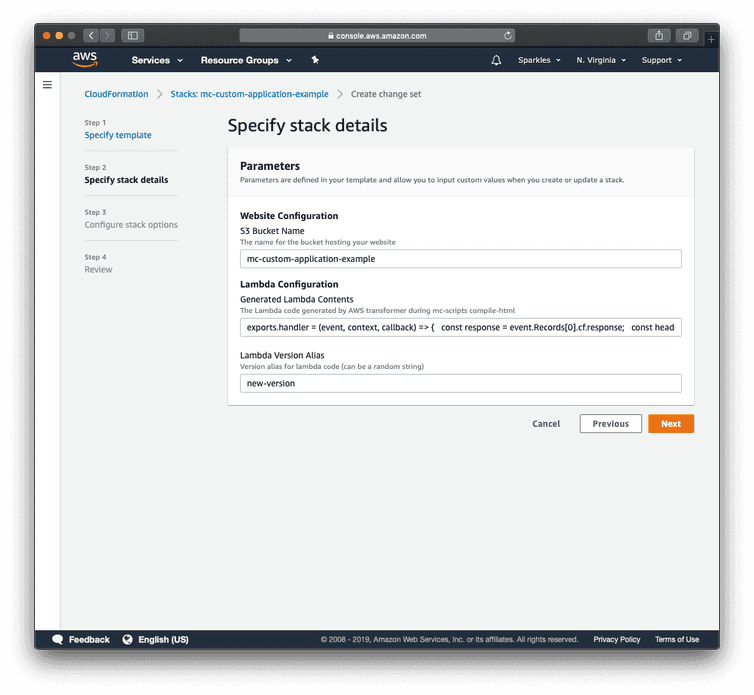
Paste the Lambda code into the Generated Lambda Contents parameter input.
Enter a version alias, which can be any string without special characters, into the Lambda Version Alias parameter input.
Continue through the wizard with the default selections until the Create change set button is shown.
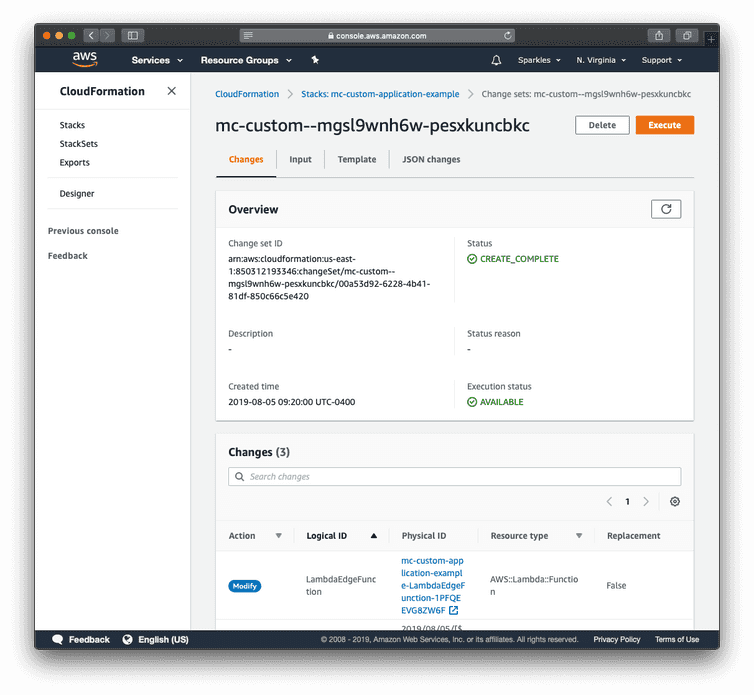
Click the checkbox acknowledging the creation of IAM roles and then Create change set.
Click Execute after the change set is successfully created. The change set will take approximately 15 minutes to complete.
Deployment
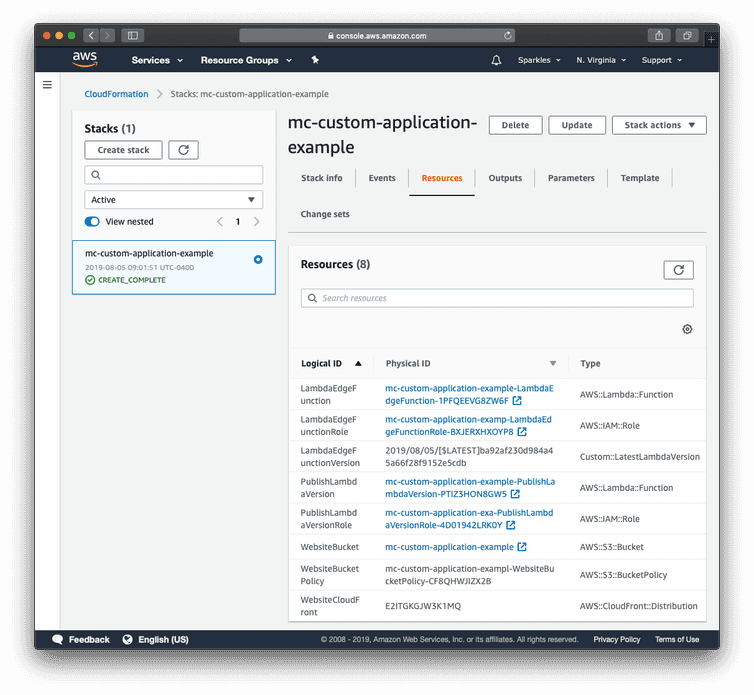
In the CloudFormation console, select your stack, and then choose the Resources tab.
Select the link to navigate to the S3 Bucket (for example WebsiteBucket) created by CloudFormation.
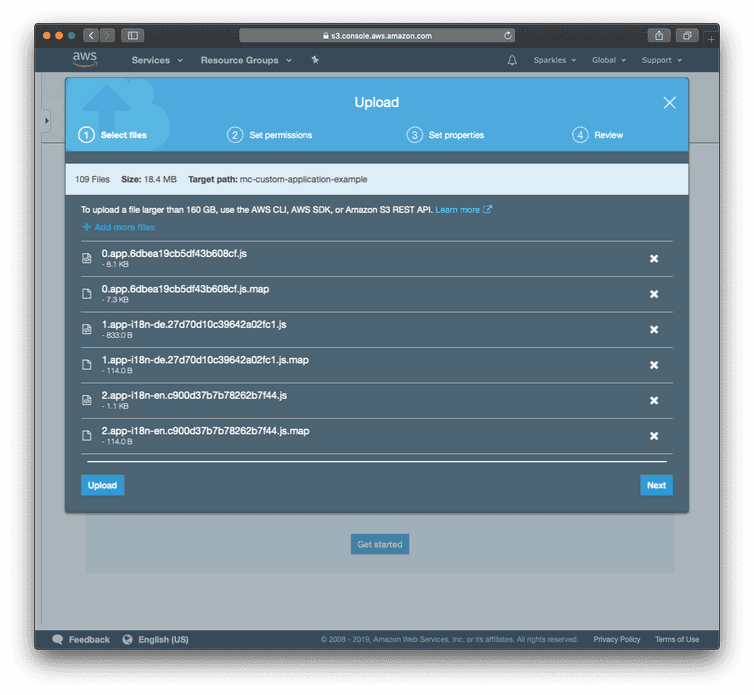
- Upload the contents of your local project's
publicdirectory into the S3 bucket.
Now you're ready to Register your Custom Application and start using it!
